Create a bot
Create a chatflow with a bot to connect with your website visitors.
If you want to connect a visitor with a member of your live team as soon as they start a conversation via the chat widget, learn how to create a chatflow with live chat.
You can also create a bot for your Facebook Messenger account. Learn how to create a chatflow for Facebook Messenger.
To watch an overview of this process, check out the video below:
| See the full HubSpot Academy lesson: Setting up Conversations |
Before you get started
Before you can create a bot, connect a chat channel to the conversations inbox. The chat channel is where you can customize your team's availability and the appearance of the widget. In addition, if you're adding the bot to a website that is not hosted with HubSpot, you need to add the tracking code to your external pages before you create a bot. The bot will not appear if the tracking code is not installed.
Once your chat channel is connected to the inbox and the tracking code is installed on any external pages, you can build a bot from scratch or using one one of five different bot templates created by HubSpot, then customize your bot actions and add if/then branches to determine the flow of the conversation.
- In your HubSpot account, navigate to Conversations > Chatflows.
- In the upper right, click Create chatflow.
- Select Website. If you want to add a chatflow to your Facebook Messenger account, learn how to create a chatflow for Facebook Messenger.
- In the left sidebar, in the Build a bot section, select a bot template:
- Concierge bot (Service Hub Professional or Enterprise only): use this template to direct visitors to the right team based on their reason for starting a chat. Depending on the visitor's response, they can search the knowledge base, connect with a member of your live team, or book a meeting with your team. You need access to the knowledge base tool to use this bot template.
- Qualify leads bot: use this template to gather information about the visitor and their reason for visiting your site.
- Meetings bot: use this template to share a meeting link with a visitor so they can book time with you or your team.
- Tickets bot: use this template to gather information about a visitor’s support inquiry, then create a ticket to track their issue in your conversations inbox. You must have access to edit tickets to use this bot.
- Knowledge base & support bot (Service Hub Professional or Enterprise only): use this template to share knowledge base articles with visitors, then give them the option to reach out to your team or submit a ticket if they still need help. Before using this template, select users and teams to route conversations to if the inquiry cannot be resolved with an article.
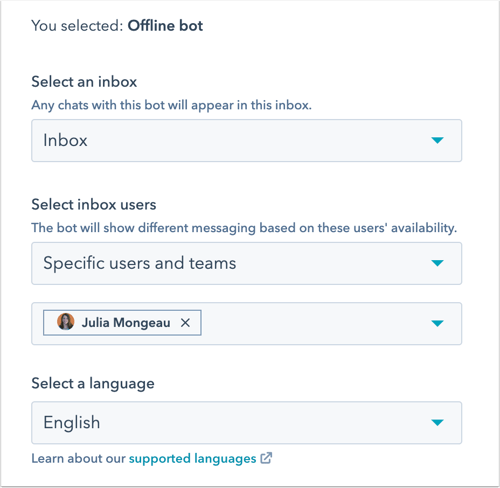
- Offline bot (Sales Hub or Service Hub Professional and Enterprise only): if your team is only available during set business hours, use this template to route visitors to available team members during business hours, then collect the visitor's email when your team is offline. You can also edit the bot's setting so that the chat widget appears outside of business hours. Visitors can leave their email address so your team can follow up when they're back online. Before using this template, select the users and teams whose availability will determine the bot’s flow.
- Start from scratch: create your own bot from scratch using different bot actions.
- Click Next.
- On the left, customize the inbox and language settings:
- If you have multiple inboxes set up in your account, click the Inbox dropdown menu and select an inbox to connect the chatflow to.
- To change the chatflow's language, click the Language dropdown menu.
- If you're creating a Concierge bot or a Meetings bot, to choose which meeting link is shared with the visitor, click the Meetings link dropdown menu.
- If you're creating a Knowledge base + live support bot or an Offline bot, to control which users receive incoming messages, click the Select inbox users dropdown menu.
- Click Create.